Milorganite: The Science, Failures and Successes

MILORGANITE as Biosolids:

Milorganite is a type of fertilizer known as a biosolid.  It has gained popularity in the home-owner market, as it should, because it accomplishes many positives on the checklist of what makes a fertilizer a good fertilizer. That being said, there are a few lacking critical parts of the fertilizer that should be taken into consideration when choosing to use it.

Producers take sewage sludge from wastewater facilities (solids) and anaerobically digest it (without oxygen) through the addition of acetogenic and methagenic microbes/bacteria. Most biosolid production plants capture the methane released by the methagenic microbes and reuse it to generate electricity to either power the plant OR to sell back to the municipality energy companies. Once the microbes consume all the material (carbohydrates, fats, proteins), the microbes are left food-less and die - this is when the biosolids are ready to be prilled.

methane recovery in biosolid production

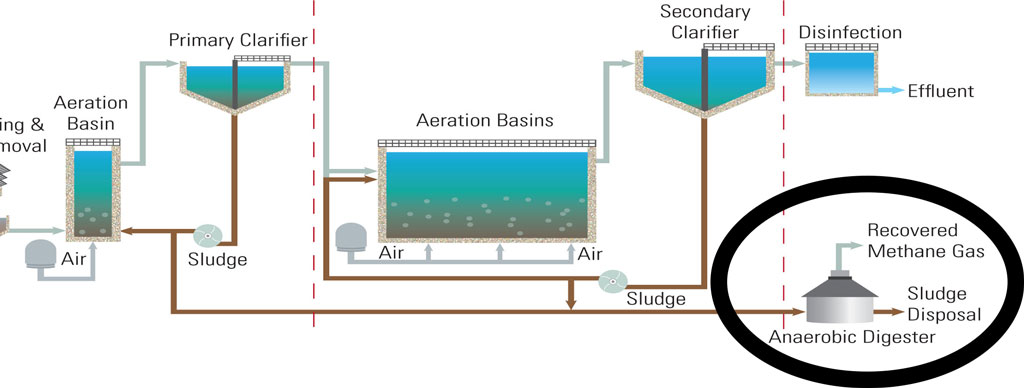
The biosolids enter a rolling chamber to agglomerate the solids as well as remove excess moisture. While rotating, they’re treated with a dusting agent and iron to provide prill “crush strength."  Finally, they are sent to be bagged for retail.

MILORGANITE - As A Fertilizer

Milorganite has a new analysis of a 6-4-0-2.5%Fe.  This percentage breakdown means there is very little nutritive value per pound, but in high quantities, it does deliver quite the punch.

Biosolids contain ~60-65% organic matter. In high application rates, this delivers a high amount of organic matter as well as soil carbon. Interestingly, when applied to soil, it does not lead to an accumulated effect of building soil OM.  The reason behind this is biosolids usually increase microbial activity, and the increase in microbial activity leads to an increase in organic matter digestion.  In the end, the soil organic matter applied is a zero net gain/loss.

Milorganite: Long Term Use

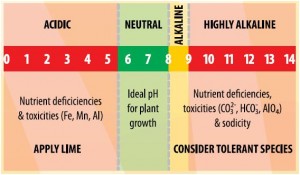
Biosolids typically contain 20-30% carbon and CAN lead to an increase in soil carbon (in turn decreases soil bulk density, leading to a higher soil surface area - storage capacity). Biosolids typically increase soil exchangeable calcium (pH buffer with continued, cumulative use).  That being said, I would recommend the use of biosolids to adjust soil pH.  It will slightly acidify soil prior to begin buffering pH.

Biosolids lead to accumulations of fatty acids, amino acids, and parrafinic structures (waxes) in the soil. Biosolids lead to an accumulation of soil P that can often bind with other nutrients - iron, manganese, zinc and leave them unavailable.

Nitrogen from Milorganite:

Biosolids contains complex forms of nitrogen coming from proteins, amines, nucleic acids, and cellular wastes - meaning in order for N and P release to occur, serious digestion must take place. Digestion leads to release of ammonium N (~3% by weight) (NH4) as well as nitrate (~.5% by weight) (NO3) [from the AMS video]

Increase in biosolid N concentration is a direct reflection of the production process. Increased efficiencies with lower heat leads to lower volatilization and ability to harness higher N rates.

Long story short - there’s nothing wrong with biosolids.

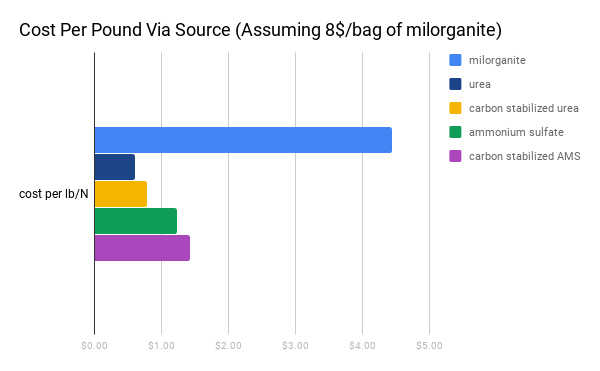
Issues: cost:reward ratio

Cost per pound: Milorganite is very expensive

Release rates:

Release of organic N sources is referred to as “nitrogen mineralization”

Biosolids typically mineralizes 3% of total N applied relatively quickly in warm temperatures

Year one typically releases 22-30% of applied N. Subsequent years typically release 7% followed by 5% and 3% respectively.

Under incubation (peak microbial performance), 30-40% N release could occur over a 16 week period at its fastest rate.

Total N from biosolids typically range in 60+% efficiency = for every 1lb N applied = ~ .6lbs gets utilized.  This would be more in line with AMS stabilized with carbon.

Also, with each pound of N that’s applied, almost a full pound of phosphorous is applied. In deficient situations, this is fine. In normal to excessive situations, this can lead to significant accumulations.

The added benefit would be the addition of calcium and minors which can be supplemented cheaply in comparison.

Final thoughts on Milorganite:

Milorganite is fine for simplicity.  It’s a simple way to make your lawn look good - a “set it and forget it” type approach to building soil N, C, and turf performance.  That being said, it’s expensive, takes a relatively long time, and it offers limits.

The limiting factor is control over color in “adverse” conditions - cold/heat (decrease microbial activity). Limiting factors is control of P levels (may not be an issue for much of the country, but transition zones, non coastal, are typically high P. High rates of milorganite can lead to excess soil P(clay soils) and ultimately tied up micronutrients, chlorosis.

While milorganite offers “almost” balanced nutrition, it does not offer any K.  Soil K levels (according to Pace) do not need to be excessively high for turf to perform well, but K is a required nutrient.  Some is better than none. A bunch is not better than some. Milorganite offers none.

Milorganite is a starting point to a more optimal growing environment. It sells itself as being complete fertilizer, but it is not complete.  Excess P (long term), Absence of K (long term) will show diminishing returns after 3-4 years without k supplementation or lack of supplementation from fertilizers not containing P.  

I’d call it a good starting point, but will leave the lawn open to additional needs to help it achieve “next level” results.

Carbon Is The Most Important Element In The Soil

Carbon is the most important element in the soil.

That’s an easy, broad statement to make.

carbon-is-the-most-important-element-in-soil


But why is it true?

Take a burn pile for instance

carbon is the most important element in the soil

Notice the grass damaged by the fire, but in the area around it, the grass is significantly greener than the rest of the lawn.  This is the result of carbon (and potash, but mostly carbon). And that’s why carbon is the most important element in the soil.

To understand its importance, it’s important to understand its role in soil development.

First, there’s the carbon cycle.  Basically, the carbon cycle is the soil’s natural ability to produce its own carbon through production and death of plant roots.  As roots die, and cycle, they deposit back into the soil as organic matter to continuously break down by microbial activity to carbon.  Microbes then house is in the deposited carbon to reproduce and then feed on the next root death deposit.  This cycle continues and continues, and as long as vegetation lives on the surface, the roots will continue to improve its soil condition (through the carbon cycle.)

End of story… right?  Well, not so fast.

As turf managers, our product is our result.  And results take time to achieve.  Typically, we have one calendar year to “make or break” a property. Establishing a mono-culture of turf is the first step.  Uniformity is aesthetically pleasing.  Producing a dark green color also adds to the aesthetics.  Both of these can be done in a one year time frame.  However, the current approach in the industry to get to this point is to use synthetic nutrients (mostly nitrogen) to drive green, fast growing grass.

So if we can achieve a dark green lawn with nitrogen only, why worry about carbon?

Remember we talked about how we had one year to “make or break” a property? In one year, we can supplement synthetically to make a property.  But if we continue to do that year over year, by year three, we begin to break the property.  So then the question becomes – how does THAT happen?

So by pushing growth with nitrogen, we stimulate significant top growth without doing much to develop root growth.  Especially if we’re supplementing with high rates of N.  What happens is lack of root development contributes to a lack of carbon cycling back into the soil.  Fewer roots develop, fewer die, less carbon is deposited back into the soil, fewer microbes populate, and the health of the soil begins to decline. Remember, carbon is the most important element in the soil…

The turfgrass at this point will become so dependent on synthetic nutrients because the soil will not develop enough health to be able to store nutrients, or break down OM to produce its own nutrients.

In theory, but cutting down our nitrogen rates, the turfgrass could then maintain its root development at an adequate rate.  And then through the course of years of carbon cycling, the soil health will improve and the turf will really thrive.

Good stuff!

Except… for those years of carbon build up to take place, the lawn will not have the same aesthetic value as another company that’s using higher N rates.

It’s a lose/lose situation. We run high N rates, our lawns look good short term, suffer long term.  We run low in rates, our lawns suffer short term, look good long term.

So what do we do?

If we begin supplementing carbon with each fertilizer application, we can build soil OM levels, microbe populations, which in turn initiate a faster carbon cycle.  At that point, the answer is easy – supplement carbon.  In case you forgot, carbon is the most important element in the soil.

But how do we supplement carbon?

There are a few ways we can do this.  Top dressing with compost is one way – but it’s labor intensive and expensive.  The second way would be utilizing an organic fertilizer like a bio-solid which comes from human waste.  This can be applied through a spreader and is relatively cheap.

So the easy answer is to apply bio-solids or compost.

Well, not so fast.

With top dressing, according to the USDA study, it takes 10 pounds of organic material to decompose into one pound of organic matter.  That is a LOT of material to break down into very little material.

According to the study from VA Tech, 10-15 lbs of organic matter per thousand square feet need to be applied through the course of the year to reduce your nitrogen inputs.  In terms of compost, that’s applying 100-150 pounds of compost per thousand square feet.  Not only is that unbelievably expensive, it’s incredibly difficult to spread.  The logistics of even moving that much material is difficult.  Incorporating that much material into the soil is a daunting task.

Using that same study, it can be more easily done with bio-solids and manure. 10-15lbs per thousand square feet per year is still expensive, very expensive, but it’s easier to source the material and spread the material. The problem we run into with bio-solids and manure is it’s expense often eliminates the budget to supply additional nutrients.  And while bio-solids and manures do supply nutrients, they’re in limited quantities and the timing of their release is dependent on soil temperatures.  According to Texas A&M, there are sweet spots of microbial activity in relation to soil temperature.  Between 60-85 degrees, we see the greatest growth in microbial activity.  It’s in that temperature phase, we get the release from bio-solids and manures.  Outside of that, we don’t.  And that leaves our program open to be surpassed by competitors.

Let’s wrap this up with our approach to soil fertility.

Recapping what we’ve discussed:

  1. Carbon is important.
  2. Synthetics are required to keep results on part or better than competitors
  3. Topdressing is expensive
  4. Bio-solids and manures are less expensive, but inconsistent.

At Outdoor Designs, we utilize bridge products.  We use carbon delivery sources from many different actives with EVERY fertilizer application we make.  We utilize bio-solids, manures, BIO-CHAR, and humic acids to deliver the appropriate amounts of carbon to create self-sustaining soils.  Combining carbon sources with synthetics we get the initial consistent, predictable feed we come to know and expect as well as the soil building properties that come with carbon based fertility.  We know that carbon is the most important element in the soil.

Contact us today to find out how carbon can improve your property.

The Case For Humic Acid

humic acid

what is humic acid?

humic acid is the organic result of the degradation of organic matter.  it’s not a single acid, but rather a complex group of multiple acids that form a humic colloid.

so what does that mean?

a humic colloid is going to be an emulsion or gel that consists of large particles all the way to microscopic particles. relating this to humic acid, the colloids will consist of a humic sludge like material (the large particles) that contains microscopic particles (fulvic and ulmic acids).

these ‘acids’ can play an interesting role in the development of soils, and in particular, turfgrass.

how does humic acid help?

to understand how humic acid helps we first have to understand what does humic acid consist of beyond the realm of particle sizes.  humic substances vary in composition depending on where the originating product is sourced.  but it’s common to see 50+% carbon chains, 40+% oxygen, plus a little hydrogen to top it off.  being a direct source of carbon chains, it has the ability to chelate.  chelating is the effect of taking an otherwise insoluble unusable form of  an element and making it – well – usable.  on top of that, being a carbon source, it also has the ability to capture and hold on to macronutrients, extending their release and root uptake efficiency.

the case for humic acids

humic acid alone is not a game changer for turfgrass professionals.  as a standalone product, yes, you are providing benefit to the soil. but there is no immediate visual impact that would justify its continued use.  so why use it?  when combined with elemental micronutrients, humic acid plays a role as a chelating agent.  this will aid in absorption through foliar and root uptake. also, applied in conjunction with macronutrients, it will extend the release and minimize the amount of loss through volitalization, leaching, and run off, due to its ability to tie the nutrients up in the carbon chains.

when choosing to use a humic acid, it’s important to consider your source, consider your fertility loads, and a performance need to be met.  it’s the not the secret sauce, but it is an excellent tool we have in our arsenal.

Summer Lawn Care and Water Saving Guidelines

summer lawn care and watering guide

Summer Lawn Care and Water Saving Guidelines

Summer is a great time to enjoy your outdoor area.  Heat, wildlife, sunshine – your body is flooded with vitamin D and serotonin.  Your plants are feeling equally as good, too.  That being said, they’re also facing a great potential to not feel so good.  So while you’re in the back yard soaking up rays, take a look at your garden or landscape plants and see what they’re telling you.  More than likely, they’re thinking about water – are they saying they need more? Less? or is everything just right…

Using the right tools

Garden hoses, nozzles and sprinklers can be a good start when irrigating larger areas. Try not to water during the hottest part of the day as a great deal of it can be lost to evaporation and runoff. Starting in the early morning will give plants ample time to take in water and allow the surface to dry before the heat of the day. This will help keep plants hydrated, yet minimize conducive conditions for the development for disease.

 Never over water the garden or landscape areas

It’s not written in stone, but it’s a fairly strong rule of thumb that lawns require one inch of moisture per week, while landscape plants require two inches per week.  Again, those numbers are starting points. Soil conditions, sun exposure, and plant or turf variety can all influence weekly irrigation requirements. It’s best to take the time to research your plants and understand their water requirements. Even if you have irrigation, don’t be scared to pull out the garden hose and give “hot spots” an extra drink to help its survival effort. That being said, if you see wilting in your plants, it’s not always a sign of drought stress. It can often signal root rot. Using your finger to push into the soil at the base of the plant, you should feel some moisture, but not standing moisture. Taking the time to learn and understand the water requirements of your garden or landscape can save you time, money, and the heart ache of a dying plant.

Avoid wasting water

I cringe when I catch people soaking down the leaves of a plant.  Plants are not going to utilize water from the leaf surface.  Focusing your watering efforts on the root system will ensure the part of the plant that needs water most – the roots – have an available supply to use. Trees and shrubs are going to utilize more water than turfgrass, but what we don’t want to do is leave the root systems “drowning.”  Pay attention to water water collects or pools as this can often lead to plant health issues later down the line.

Keep your mulch fresh

Mulch is an important component in moisture management. Understanding how much you need is even more important.  A fresh 1-2″ layer in the spring and fall can help minimize the amount of water lost to evaporation.  Be careful mulching around trees – use an extremely minimal amount.  Aggressive tree roots can grow into the mulch and then will rely on it for survival.  Remember, as mulch breaks down, it releases vital nutrients plants will use to survive and thrive – so keep it re-energized with a fresh layer every year!

Epsom Salt… To Save Your Lawn?

epsom salt to save your lawn

Epsom Salt… To Save Your Lawn?!

Epsom salt has been a go to home remedy for years. Known as a natural exfoliant, a remedy to

dry skin, sore muscles, small wounds, or used to create an inhome home spa experience,

epsom salts are widely used. What many people don’t know is that epsom salt can give almost

miraculous results to any lawn or landscape!

What is Epsom Salt? And Why Does It Work?

Epsom salt is simply magnesium sulfate. Broken down, that’s magnesium and sulfur. Now the

question is, how does magnesium and sulfur affect turfgrass and landscape plants? As it turns

out, magnesium plays a vital role in photosynthesis and the production of chlorophyll. A plant

that has an adequate amount of magnesium will allow for more efficient photosynthesis and

thus an abundance of chlorophyll. Having plenty of chlorophyll in the plant tissue is what gives

it that dark green color. As a result, having an appropriate amount of magnesium equates to a

healthier, greener plant!

When Do I Use It?

Epsom salt is best to use after periods of stress. This can be after a long hard winter when the

grass or plant is trying to wake up and stretch its wings, OR it can be used after a long hard

summer when plants are trying to recover and store carbohydrates for the winter. Though it can

be used anytime of the year, these two points will provide the most dramatic response in the

plant.

How Do I Use It?

Epsom salt can be applied in granular form. Granular epsom salts should be applied at 3-5

lbs/1000sqft of turfgrass. For landscape plants, it can be applied as a few handfuls. If you have

the appropriate equipment, epsom salts can be dissolved in water and applied at the same rate.

Either way, the results will be equal.

How Often Can I Use It?

Though epsom salts produce big effects quickly, it can be overused. It’s safe to use it only once

or twice per year as part of a regular lawn care maintenance program. Epsom salt also contains

sulfur. Grant it, sulfur ALSO plays a vital role in the health of plants (disease resistance), it can

make the soil acidic when overused. However, limiting your applications to once or twice per

year will not have enough of an impact to alter your soil pH.

Who knew? Epsom salt, great around the home, lawn AND garden!

Here is a collection of places you can buy bitcoin online right now.

Benefits of Hiring A Lawn Care Company

Benefits of Hiring a Lawn Care Company

lawn care company


Benefits of Hiring a Lawn Care Company

What happens when you don’t have the resources to have a great lawn on hand? Naturally you will still want to have an immaculate and amazing lawn. What you may not have is the time to put physical effort into it, so you will need to look for professional help to make landscaping and gardening a job handled quite easily. Although you can still do a decent amount of work on your own, you should still look for professional services for the following reasons:

  • Saving time

Perhaps the best reason to hire a lawn care company is the fact that you will save a lot of time in the process. First of all you will need to spend a few hours planning to go on researching what to find for your lawn needs. It would not take long for you to find potential companies that give you a chance to make things work for your lawn. You can invest time of your own to a couple of stores so you can find equipment, fertilizer and seed as well as other solutions, but you will have to also take commitment to maintaining and mowing your lawn, which of course takes time. Calculate the time it takes to call up a lawn company and to have them take care of the project and to how long it will take you to get this done. Whatever the case there will be a contrast in the end, so make use of your options.

  • Expertise

Even if you don’t want to do a lot of time on your lawn, there is simply no insurance that you won’t mess this up. Sometimes you can do the job yourself, but you will rarely do it with the same expertise and capability that a professional company would have. People work with experts for a good reason, since they have the experience to make all of this work quite well. Hiring a lawn company will be a great way to figure out better results, specifically getting better results than working alone.

  • Costs

Lawn care companies often subsidize their overhead with the volume of the work they do. In other words because you won’t have to take care of many lawns, it will be inconvenient and overly expensive for you to purchase most of the equipment necessary and used by lawn care companies. Lawn care and landscaping contractors can procure equipment loans, as well as paying off incrementally through contracting work. For you to be able to equal that quality of lawn care you would need to purchase a rake, split readers, leaf tarps and leaf vacuum, a ride or push mower, power aerator and so much more. In most cases you will actually be saving a lot more money using a lawn care company. When the day is done the final costs for gardening and landscaping will be much smaller than you think, so look for opportunities when you need lawn care.

6 Landscape Design Mistakes

6 Landscape Design Mistakes


that can Ruin Your Home


landscape design mistakes


Clumsy and neglected landscaping can not only damage your home’s curb appeal, but it can easily cut

the value of the property and it will make it a lot harder to sell if you’re not careful. Real estate

appraisers will often warn that bad landscaping is one of the most serious buyer turnoffs that may really

make your property languish on the market and to hurt its prices. Make sure that never happens to you

by checking out the following common mistakes you can make when working on your home:


Planting with no plans


When it comes to landscaping, some choices may last you for a long time while others may only last a

season. Taking the time to plan out and plot the yard will give you the best potential approach to make

curb appeal work with great aesthetics in mind. If you are not quite certain how to approach your design

needs, then you should consider making use of a landscape architect for a more accurate set of results.

They will give you a hand in figuring out the yard and to provide plant lists you can work with for

landscaping purposes yourself.


Keeping things too close to each other


Planting in clusters may look a lot better than installing single plants, all throughout the yard. You should

make sure you have your groups of shrubs, perennials and trees that have plenty of room to spread

around the area without looking overgrown or choked. Overcrowded landscaping will compete with

itself for water and food, putting all your clustered plants at risk, especially during times of drought.

Check out how high and wide your mature plants have to be and then work on combining that

information into spacing suggestions on the planting labels. At first the garden beds of your young plants

will look too airy, but within a couple of years you will see the beds filling in.


Zoning out


You should never be seduced by catalog plants that look great on paper, but are not suited to the

hardiness zone where you are. You will wind up with plants that may die prematurely and will demand

winter covers, daily watering and more efforts to keep your plants alive and healthy.


More of the same mistakes


You would do well to resist the design temptation to completely change your yard and to fill it up with

your favorite shrub or plant. This will only make for a boring monochromatic look, making your yard look

good only at a part of the year while looking pretty drab the rest of the year. Mixing things up and

striving for a four season color will be a much better solution. A good example of that would be to

combine your spring blooming plants with some summer blooming roses and autumn ones as well, such

as burning bushes (Euonymus alatus). For some winter color you can add hardier shrubs such as red osier


Refusing to bury dead plants


Nothing will make your curb appeal plummet like rows upon rows of dying or dead perennials. You can

quickly remove your dying plants from the front and side yards to make use of them in a different way,

such as composting or something similar. Landscaping can sometimes succumb to infestation or disease,

so you would do well to inter the dead plants in plastic bags and then add to the trash.


Weeds going out of control


Weeds will not only wreck the looks and health of your landscaping, but they will really compete with

the vegetation for water and food. They can also shorten the life of your stone, brick and more, creating

cracks in mortar as well. The best way to stop the weeds from spreading would be to spread a pre-

emergent a couple of weeks before the weeds germinate. This will usually stop them from growing, so

make use of the chance to do so.

Practical Landscaping Tips and Ideas

Practical Landscaping Tips and Ideas


landscaping tips

When it comes to the art of landscaping, the useful way would be to combine your aesthetics with the practical side of the job. The examples ahead will explain ways you can pull this off without breaking the bank but by making your landscape great-looking and easy to maintain:

  • Using flowers in your entryway

Flowers will always add to the good looks of a place, making it seem more welcoming and interesting. Petunias, lilies, roses and whatever else strikes your fancy will get the job done right. Perennials will be a wonderful addition to any home if you want to make use of all of it. Making use of your small and low fences at the front of your yard, as well as other areas will really help make the curb appeal tie up together quite nicely.

  • Plant some rambling vines

Clematis can be one of the more interesting solutions with vines you can use out there. It comes in red, blue, pink, purple and even white blossoms. You can grow them in a container, as well as on a trellis or another solution that allows it. You can work on this by growing them inside loose, well drained and fertile soil, providing enough organic material to make it happen. It will need to cool off its roots so you can plant them where it will see enough sunlight, but at the same time the roots will be shaded for this very reason. Fertilizing can be done during the spring each summer or spring with some organic fertilizer that is meant for roses and tomatoes. Pruning them will depend on the type of growth and bloom, as well as the old growth and new growth. You can find clematis around most garden or landscaping centers, as well having it mail ordered if you can’t find any around your area.

  • Decorating your driveway

Sculpting your landscape will help make the choice of using materials and plants that are strong a good one, but you have to also cover some unattractive spots around your driveway. You can begin this by starting with a raised island of the lawn in the center of your driveway. Add a low boxwood hedge or something similar and you will have a much easier time making do with annuals, perennials, roses and the like. You can do this for a nice blend of textures, colors, lights and so much more to make your gardening and landscaping worth it.

  • Planting lilies

Crinums are one great plant you can use when you are facing drought, as they are extremely hardy and have no need for fertilizer, thriving in hot and humid summers with a nice pleasant scent. Crinums prefer at least five hours of sunlight, so this would be a good solution for coastal and tropical climates, with some varieties capable of surviving even in the northern areas, allowing for a more flexible solution you can really work with during your gardening sessions.

Got weeds? Let’s Kill ’em!

Wild violet weeds

Cooler Weather Slows Weeds

So we’re certainly into cooler weather, and thank goodness the grass has slowed down growing. That being said – not everything has stopped growing.

Once the soil temps dropped below 70, the weeds of summer slowly began to die. The frost finished them off. The beautiful thing about nature – as the summer weeds died, the winter weeds germinated. Winter weeds love, even thrive in the cold. They’ve adapted over the years to thrive in even the coldest of winters. So as we continue to get adequate rainfall and plenty of sunshine, the weeds are ready to go… GROW!

You Mean, I’ve Still Got Weeds…?

So what do we do about killing the weeds?

Pick a decently warm day, preferably above 50 degrees. This will make sure the plants are breathing and photosynthesizing. And go ahead and plan to make your application of broadleaf weed control to kill weeds. Conrolling weeds should be simple with an herbicide, but which one do you pick?

Step 1. Identify weed.

Knowing which weeds you have in the lawn is the most important part of killing weeds.  Without it, how could you choose the right product?  How would you know you’re treating it at the right time of year?  How do you make sure you’re using the right rate to kill it and not make it stronger? Let google be your friend. Still can’t find it? Ask me!

Step 2. Choose the right product.

If you have a little henbit and chickweed, a simple 3-way phenoxy herbicide will suffice. These materials contain a plant hormone that force the plant to grow into its death. They usually take ~2-4 weeks to give a thorough kill in the cold. If you have a lawn full of wild violets, now is the time to use a more specific product. I like to use one that contains triclopyr & pyraflufen. The pyraflufen will provide a very quick burn down of the weed. The triclopyr will offer long term, systemic control of the weed – thus giving quick and lasting results. It’s important to make sure the product you use will actually kill weeds – not allow them to build a defense.

Step 3. Read The LABEL!

For applicators and homeowners, there are laws that govern herbicide applications. The labels attached these products are not suggestions, they’re the law. If we’re to preserve our environment, we are to follow the laws stated in the label to the best of our ability – even when it’s to kill weeds.

Step 4. Make an accurate application.

Spraying weeds can be as difficult as you want it to be. To guarantee results, an accurate application must be made. That means having the proper equipment. Even though you may have a 100$ backpack sprayer, pumping it too many times or choosing the wrong nozzle can cause a burst effect that leaves a dead spot in the lawn… 🙁 When in doubt, don’t hestiate to call me. I love to kill weeds!

How do you plan on tackling your winter weeds?

Comment on social media and let me know!

Easiest Way To Adjust Soil pH

Adjust Soil pH can have a dramatic effect on growing conditions and plant health

Easiest Way To Adjust Soil pH

Soil pH is a hot topic.  Here in the southeast, most soils are acidic in nature.  The soil tests I’ve pulled this year have averaged from 5.8-6.5, which is on the slightly acidic side.  But how do you know if you have acidic soil?

  1. Excessive Weeds. This isn’t a sure fire way to tell if you have acidic soil, but it is a POTENTIAL indicator.  Some weed varieties tend to favor acidic soil.  If weeds seem to be out competing your turf, this could be why.
  2. Excessive Moss.  Moss tends to thrive in shady, wet conditions, so again this isn’t a sure fire way to prove acidic soil, but it can be an indicator.
  3. Non-responsive Turf. If turf shows no response to applications of fertilizer, then we are likely facing a pH issue.  I know if I’m treating a lawn and I get less than expect results from fertilizer, the first thing I’m going to do is pull a soil test.
  4. Soil Sample. Soil samples should be pulled on all properties at some point.

So you pulled a soil test, and your pH is 5.5.  Fescue tends to prefer a pH in the 6ish zone, so I’d recommend working on a way to adjust soil pH.  But how? There are a couple of ways to get the job done, but it comes down to how quickly you need the adjustment to take place, and how long would you like the adjustment to last.

Dolomitic Lime is a great long term solution – with emphasis on the long term.  Dolomitic lime will take months to adjust soil pH.  Dolomitic lime is an easy way to get the job done. Because it’s pelletized you can simply throw it in your spreader, adjust to your desired setting, and spread away.  Rarely do I ONLY apply dolomitic lime when facing a serious pH issue because there are other fast acting products.

Calcium Nitrate is my favorite go to product for immediate pH action.  Calcium nitrate is usually labelled a 6-0-0 micronutrient fertilizer.  It has 6% nitrogen in the formulation so it will give you a small boost of color.  Best of all, it very quickly and significantly can adjust soil pH.

Is acidic soil affecting your lawn? Pull a soil sample and consider an application of dolomitic lime and calcium nitrate to correct your issue.